Saturday, August 21, 2010

Botmill just changed the game again.

I am blown away.

Spent all night thinking about the Mk5 extruder and how it changes the game.

Then I go onto the RepRap Wiki.

I notice Botmill had updated the Buying guide.

And I see this:

$1245, fully assembled Mendel, (or unassembled $945) printed on a professional printer, only lacking motors and electronics!

Ohh I forgot to mention, it is available in Blue Black Green Yellow, and Red.

How big is that?  1 year of blogging and I have never changed font size, I had to go and find out how to do it :)

Why is this big?  I mean seriously you can get RP parts from Ebay for $200-$300, and the rod and bearing set for $200, and the Thick sheets for $35.  So you can get basically everything that is in this kit $945 kit for $550 is you shop around.

It's big because these parts are not printed on a RepRap, they are printed on a professional grade printer, aka you know the quality will be as good as the top 5% of our hobby.  The lowest cost that these parts could be found for before this was from Protovantage for $1500, dropping that price to effectively $700 is mind blowing ($945-$35-$200).

Also given that they are likely sourceing the parts from a factory, part availableity should not be as much of an issue.  Also, from what I have heard and seen Botmill has improved in the last few weeks.  I no longer see the unresolved customer service issues, and they are much more active than they where at one point in the wiki, IRC, and forum.  I still see confusion on their electroncis, but you see confusion on all electroncis.

What a week.  To think in the past few weeks these things have happened:


$35 6lb rolls of ABS, confirmed to be reliably printable (I have printed with Mk4 extruder Makerbot.  If it will print there, it will print anywhere!)


China joins the Game with a $1500 (to start) folded steel RepStrap, that uses a heated build plate and stepper out of the box, and news is they will be adding Paypal payment soon.

BTW they are now posting pics over at Thingiverse, lets hope they share designs (and posting on the wiki too, might make us all much more comfortable with them (even if it's only a little).


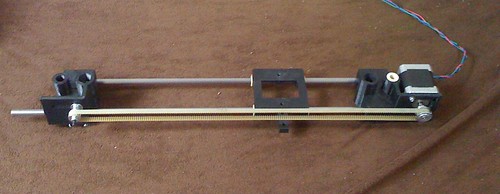
X-axis prototype, motorized, originally uploaded by prusajr.

Prusa Mendel


Prusajr's doing a wonderful job cutting down the printed mass on Mendel, he posted a video of it over here.


If you haven't been keeping up the Mendel Part's "Generation 6" electronics, They are estimating there electronics price as being $175 with their opto end stop cables.

It's been a heck of a few weeks, has any noticed that the pace of expansion/improvement in this hobby is accelerating at a incredible rate?

Friday, August 20, 2010

The Makerbot Mk5 Extruder has exited the Botcave

I love my Makerbot, I hate my Mk4 extruder.  Ohh the pain it has caused:

-Idler wheel loosening up over time
-Idler wheel snapping in half
-PFTE bulging
-PFTE popping off (before the bolt became standard)
-Nicrome frying itself
-Broken retainer rings
-Gunked up drive pulleys

I looks like Makerbot has eliminated the possibility of all the common Mk4 failure modes..  Now don't get me wrong, I am absolutely sure we (at least me :) ) will figure out how to break this thing, but it looks like the weak link of the Cupcake, the extruder, has been solved (we hope).

I though it would be a fun excersize to play "find the fix" with this design.  Like all good ideas, it's a copy's a lot  of other designs that work well.

The Mk5 drive gear:


Hobbled gears have been around for a while in the hobby, but they where made famous by Wade's wonderful geared extruder.  The 1st time I ever saw one works was Nophead's Tiny Stepper Torques Big post.  Ever since the 1st time I saw it, I wanted that for Makerbot.  I have used my Mk5 drive gear in my Mk4 Makerbot since the 1st day they offered it, and honestly it really does improve the Mk4, but it didn't fix it.  The Mk5 looks like the final Fix.

Tensioner


The Tensioner was 1st introduced by Charles Pax for his Paxtruder 0.1.  I remember reading his blog and thinking, god I wish I could buy that thing...  well it only took a year :)  I still think the spring and 608 approach is better, but for a laser cut design, this is likely as close to perfect as you can get.

The Power Resistor Heater

The heater looks to be derived from the work of Nophead's.  Funny how SO many things in this hobby go back to Nophead, we need to throw him, Adrian, and Zack a party..  Oldest reference i can remember actually using power resistors was his Pear Shaped Post.  Cool thing is if you want something like this on the Mk4 you can buy a kit over at Makergear, but it does not require a relay, and only uses 1 smaller Power resistor.  I have not used it yet..  My hot end is still working, and I have a backup that Rick over at Makergear put together, but I hear it heats up slower than Nichrome.  The Mk5 looks like it will heat up nice and quick with it's relay:).

Thermal Barrier
The Thermal Barrier looks to have been heavily inspired by the Bit's From Bytes Thermal Barrier
PFTE tube constrained by a stainless tube.  It's brilliant really.  Slick, strong.  It's great stuff.  I 1st read about it at the Rapman Blog.  Unfortunately it's not "Fab-able".  But as the Rapman has shown for over a year now, it's a rock sold and relaible design.

The Nozzle
The nozzle looks basically the same (besides now being a male instead of a female), but honestly looks much closer to the Makergear Big Head Nozzle than the old mk4 nozzle.  I know the people who have tried the larger headed nozzles have found that the larger head acted as a thermal battery, holding the heat and allowing for a more consistent extrusion. 

Plastruder Mk5 looks like the a true changing point for Makerbot.  There was very little difference between the Mk1 and the Mk4 Plastruder.  Sure there where changes, but in the end it was always the Child of the Hercules.  Mk5 brings marks the end of the Hercules generations of Plastruders, and begins the Paxtruder generations of Plastruder..

As much as I like this design, it does mark 1 real change for Makerbot.  No longer can it be said that you can build the Makerbot extruder with a laser cutter and a drill press.  The hot end has now entered the only makeable with a lathe world.  Guess I can't get too bent out of shape over it, Adrain's new nozzle is a Lathe only design.   At least RepRap and Makerbot both did a LOT OF WORK making the fab-able nozzle design as relaible as it could possibly be.

Makerbot now has a Paxstruderesque  tensioner, Wades Extruderesque drive gear , a Rapmanesque thermal barrier, a Nopheadesque heater core, and a Makergear big head nozzlesque nozzle.

That's why open source is so great, we all build on the shoulders of Giants.  How long before we see this hot end on a Wades Geared extruder, for the ultimate extrusion Machine! :)

Sunday, August 15, 2010

Hopping Mad, changing direction.

I have found out that of the sets of Mendel I have printed, only 1/2 have been assembled at all, and NONE are printing.  No matter what people think, there is no money in printing Mendels, or honestly any RepRap, even if it was only 2 hours to print, you couldn't really "get your money back".  I print parts for people because I want to spread the hobby, obviously I have failed.


I am starting a Credit Union for Reprap over at the Reprap Wiki. I came up with a very original name for it SpaceXULA Union. :)

Here are the terms:

The Fees:
$100 Mini Mendel (Current Version as http://www.thingiverse.com/thing:3581($50 back if you replace within a month)
$30 Prinstruder II http://www.thingiverse.com/thing:1980($15 back if you replace within a month)
$40 Wades Extruder http://www.thingiverse.com/thing:3069($20 back if you replace within a month)

The "Terms"
-To receive parts you must have Hacker space or group with multiple members (And have some way to confirm this to SpaceXULA's satisfaction).
-You must promise to form a bank once you have an operating RepRap.
-You must pay a deposit before I send the parts
-You must be within the United States (Sorry, Import dues make international shipping unfair to the receiver)

The Benefits
-SpaceXULA promises to support you though to completion of your project, you are getting a relationship. You get the parts, and if you need more parts because you break them, or the design changes before you can get your own printer operational, he will provide them as 1st priority prints.
-If SpaceXULA receives a set of parts back from you within 1 month of the day you receive the parts, he will PayPal back to you 1/2 the cost of the part to you.

If your interested, please add your RepRap Wiki user name under Aplicant, and I will contact you right away.

I have 5 Wades Extruders,  2 Prinstruder II, and 1/2 of a Mini Mendel ready to go.

Saturday, August 14, 2010

Wasn't going to Blog it, but Jay/Makerblock said I should :)

My daughter got in trouble at Bible school a few weeks ago. One of the boys brought a Transformer to class, so my daughter started telling the other kids about her father's robot that sang songs,and made toys. She went on and on about it, talking about how it woke her up at night, about it's 2 babies, and how it would bite you if you put your hand in it's mouth. The teacher told her that she needed to stop lying. My daughter, with all the dignity that a 3 year old girl can muster (which is a lot), told her that she was telling the truth, and didn't appreciate being called a liar.

About 30 minutes after this my wife picked up my daughter from school (she was still in the corner, now crying because she had been sent back 3 times because she refused to admit she was lying). My wife asked what she had done to go to the corner. The teacher told my wife about the "lie" that my daughter was telling. Needless to say my wife insisted that the teacher apologize to my daughter.

Best hobby (and daughter) in the world.

Brutis is dead, long live Brutis!


Instead of focusing on Brutis, I am going to dedicate my time to getting the fully metric, 606 bearinged, NEMA 14 mini Mendel working 1st.  I think Brutis would have worked, but I am not going to touch it for a few weeks.  If you want the design files they have been uploaded to Sourceforge here.Take it as your own if you want.  Any questions don't hesitate to PM me.

I have my Mini Mendel put together, and have been trying to run the Bowden extruder.  I can already tell that unless someone does some very slick codeing, or we put a second booster motor at the hot end, it's never going to print at a quality level anywhere near even what Makerbot does, which is not exactly the highest of quality out the box.

Problem is they went with a boden for a very good reason, NEMA 14 are VERY low toque, and any height added to the trolley directly reduces you maximum build height.  I tried attaching a Prinstruder onto the trolley, but both it, and a Wades where HUGE on that little trolley (looked like an elephant riding a donkey).

I needed a smaller high torque extruder that could fit on a Mini Mendel X trolley.  I came up with this:

It's the Kysan/Makerbot gearmotor using the MK5 wormgear and a 608 bearing idler like a wades extruder.  I printed off a copy last night (something wrong with being able to print an extruder in 30 minutes :) ).  Even with the filament being a little off it was able to lift itself, and the gearmotor up a length of  HDPE filament, good sign on the grip end of things.  Added the hot end today, and tonight I am hoping to have my 1st extrusion with it, but that brings me to the sad news.

The thermistor port on my Extruder board just gave up the ghost.  Swapped the thermistor, reloaded the firmware, even taped the thermistor to the back of the board, nothing.  Thanks to some guidance from Kliment looks like I could install a thermistor off the A7 port and change the firmware slightly to take the temp from that port instead.  As a work around I took my Mini Mendel extruder board and put it over on my Makerbot.  I will do my exstruder testing off my Makerbot and deal with the soldering when i finish up the mini.

I hate Windows Movie Maker, it takes SO LONG to bring videos into the library, and then over 1 1/2 hours to process 15 minutes.  If anyone knows a faster option that allows for videos to be edited, double speeded, and and the ability to add titles, let me know.

Back to good news.  My 3 year old daughter decided she needed to be like daddy and take apart random pieces of electronics. Unfortunately she chose as her first victim my microphone (it was already broken). Didn't realize it until I found the outer casing of it reattached with silly puddy. She claimed to have fixed it, which amazingly enough meant the speakers where twice as loud, but the microphone still didn't work any more.

Birthday was good, got a Drill press from Harbor Freight for $60 bucks, and a new microphone.  Fun Stuff!

Friday, August 13, 2010

Interesting Repstrap

Doing my weekly blog search I found This Gem Out of Utrecht.  Mmmm, So pretty.

Added their blog and a few others to the Google Reader feed , We are now up to 266 blogs.

Saturday, August 7, 2010

A guide to getting into RepRap (only my opinion)

I am always seeing people trying to get into RepRap Printing, but there is always the question of price.  I am no expert, but I wanted to lay out in a Post what I have seen.  I will go from the lowest price to highest price.

Community!

Cost: Free  up to your 1st born child
Difficulty: depends
Reliability: depends

My 1st suggestion to every person trying to get into RepRap is to try to find a local RepRap/RepStrap owner.  There are several ways to track these people down, but some of the best resources are:

The RepRap Map
The Makerbot Map
Remember both of these have multiple pages, so look though all the pages each has different pins!
Regonal User Groups Sebastian over at the Wiki and forums has been nice enough to start a Regional User group for almost every area in the world (how does he find the time?).  If you have a printer, or want a printer update the RUG page in your area.  You never know who you might find!
The Hackerspace Map (They don't always have RepRap/Repstrap, but they will likely have some of the tools you need)

WolfStrap
Cost: There has been talk that this can be put together for $3-400 dollars, I have only seen the original
Difficulty: Home made Repstraps are always an adventure
Reliability: Depends


The wiki page shows some details, but this is looking like the "official as it gets" RepRap.org RepStrap. 

The Wild World of the Mendel/Sudo-Mendel

This is the contentious section of any list. EVERYTHING is debatable because no one to date has really built up a track record.  To keep the price comparison reasonable I am only going to compare the prices of their RP parts replacements.  Keep in mind that Once yo have your RP part replacements you still need your electronics, hardware, motors, belts and lasercut parts.  All these together will be $557 plus shipping if you  spend $260 for your hardware, belts and bearings at Ultimachine, Get a Wades extruder off Ebay (there is usually at least 1 up at all times now) for $30, Thick Sheets from Techzone/Botmill for $37 and $230 for electronics (4 major sellers of electroncis now, of varying levels of quality, check them out before you send them money!).

Remember add $600 to any of these prices to arrive at what your cost will be for the printer (using conservative estimates)

RepRap forum, Ebay, Etsey or Sellsemp.ly RP parts printed on another RP printer.
Cost: $60 - $400
Difficulty: Parts are usually printed in either ABS or PLA (HDPE has went out of style).  Easiest parts to put together.
Reliability: The VAST majority of all Mendels to date are made made this way.


If you can get these parts, they are the best to go with, but the supplies are VERY limited because they take 40-60 hours to print, and that is a challenging amount of time.
Folon Labs on Ebay
Cost: He has sold parts for $65 - $297, but the price is usually $150-$200
Difficulty:  The parts are Resin cast, so you will have to process them, and I have heard both good and bad things about his product (you always do).  I have not seen one assembled in the wild to date.
Reliability: Not enough info.


His website is Fotonlabs, and he usually has at least 1 set of cast parts up on his webstore.

BotMill/Techzone
Cost: $199 - $202
Difficulty: Parts are made to be drop in replacements for Mendel, but I have seen many people have issues with the assembly.  I have not seen a blog entry to date of one built "in the wild"

Reliability: Not enough info

There are 2 variaites of these parts, the processed, and the unprocessed.  Unproccessed parts are sold at Botmill for $199, and the processed parts go for $202 at the Techzone Ebay site (These are the same parts, Techzone sells parts to Botmill).  From comments in the forum the processing is quite intensive, and if you don't have a wood shop, you might want to get the proccessed parts, or go for the full kit (later in this post).

Fleming cnc Isaac Mendel

Cost: $245-$270
Difficulty: These parts are made on a CNC, not a laser cutter or cast.  The parts SEEM of a higher quality than all but the RP parts (which vary wildly in quality).  They should not require processing, but I have not seen anyone blog a build in the wild)

Reliability: Not enough info

FlemingCNC has been selling their kit, the Isaac Mendel, for a few months now.  I have not seen anyone blog a build, but the kit has changed material, and included the belts and gears.

The "other ways"

Ponoko Darwin You can still get the parts for a Lasercut Darwin (the daddy of the BfB Rapman printer), for free or for a small donation to one of our favorite designers Vik.  It costs between $300-400 if you have Ponoko cut the parts, or between $200-$300 if you use BigBlueSaw.

Cut your own Techzone Mendel This should be possible considering they have uploaded the source files.  I don't think anyone has done it to date.

Laser cut Mendel by Decru This lasercut Mendel was Decru's master's thesis.  I dont' know if it ever printed, but again, you can upload the files to BigBlueSaw, Ponoko, or your local laser cutter and give it a go!

Cut your own Makerbot.  It can be done using Charles Paxes Muffin, The Makerbot svn, or the Routerized Cupcake CNC Body Panels by pandelume.  ( Believe it or not I have seen many more non Makerbot sourced Lasercut parts for Makerbot produce working printers than I have seen non RP Mendels print.  But that makes since in a way because Makerbot is the only lasercut design designed from the ground up TO BE LASERCUT.  All the other designs are coping a printer designed to be printed and shoehorn it into a laser printer ).

I don't know of any other RP replacements, if I missed one please Email me and I will update this post and repost!

The Kits:

I am only including full kits, with basically everything you need in the box.

Botmill/Techzone Lasercut Mendel


Cost: $799
Difficulty: I have only seen one printer put together in the wild, and the guy said it was a hard printer to assemble (I can't find the link now, sorry). 

Reliability: Not enough info.

Botmill sells them at their webstore, and Techzone sometimes puts the same kit up for sell on Ebay, but they are always available at Botmill.  They are the new guys to the game.  They seem to be having more issues than Makerbot did with Batch 1, but that is to be expected with any new kit.  I personally wouldn't buy it, but I am also the dude that had cash in hand when batch 1 went on sell from Makerbot, and STILL waited till batch 9 to buy.  $500+ is serious money.

Makerbot CupCake
Cost: $950
Difficulty: The easiest printer to put together, It would have took me 9 hours if I hadn't shot video.  The cartiean bot is almost perfect, but the Mk4 extruder can give you head/heart ache.  I love mine, but be preparts to buy some replacement parts! :)
Reliability: Very once you learn to use it, till then it's evil


The full kit at Makerbot has been $950 for a year now, which is great because their demand is though the roof.  They could price gouge, but they haven't yet.  For me it was a toss up between the RapMan and Makerbot.  I chose the Makerbot because it was smaller, and had a stronger support base in the US.  I have regretted that decision at times, but in the end I love my Makerbot (30 hours not shut downs at this point woho!).

Bits From Bytes Rapman 3.1
Cost: $1,270 at current exchange rate
Difficulty:  More difficult to assemble that Makerbot, due to it's larger piece count, and acrylic material (don't over tighten those bolts!).  Able to print 4 times as large of area, and is significantly more acurate than Makerbot.  Also it can print independently of a computer (it has a LED screen where you can print your stl directly)

Reliability: Very once you learn to use it, but not as steep of learning curve as Makerbot

Rapman by Bits from Bytes was the 1st Commercial RepStrap, and is very much based off the RepRap Darwin.  It is still being sold, and is a rock solid printer.  The support base is thin inside the US, and even in Europe it doesn't seem to have sold nearly as well as the Makerbot.  Any person that considers a Makerbot, should also consider this printer, It's definitely worth the $300 difference if you can afford it.

Up! by pp3dp
Cost: $1,500 (will rise to $3000 once they have sold 100)
Difficulty: They seem to sell it as a out the box printer.
Reliability: Not enough information


PP3dp is selling their printer for $1500 for the 1st 100, then raising the price to $3000.  You can't use a standard web interface to purchase, they have to send you a purchase order.  They have only been our for 1 week, so I really would be very warry, but their printer does look awesome!

Shappercube
Cost: $2,565 at the current exchange rate
Difficulty: They come mostly assembled, but I can't say

Reliability: I have seen them print online, but there have been only 12 so who knows.

RepRapSource sells this kit on their website, and honestly it's sexy as heck.  It's the only all metal RepStrap, and looks mean as heck.  I don't know much about it, but just look at it!  :)  It needs rally bars.

BFB 3000
Cost: $3,185 at the current exchange rate
Difficulty: It comes mostly assembled.
Reliability: It's a Bits From Bytes product, so likely pretty good.


This is currently the most expensive RepStrap avialable, but your likely getting what you pay for.  This machine looks like someone over at Bits from bytes took the joke Apple 3d printer a little too seriously:
If budget is not a consideration, this is likely the printer for you.  This is the machine that likely the folks over Stratasys where really hoping would not happen.  Good job guys, way to make the Mercedes of RepRaps, or I guess since they are British, it would be the Lotus.

Monday, August 2, 2010

And here come the Chinese.


Degroff over at the Makerbot Google pointed out this video.  The company Personal Portable 3d Printer is offering a "RepStrap" with a heated build plate, stepper extruder, and metal frame for $1500 to the 1st 100 orders, then the price goes to 2,999.

I love the design, but wow this is a shot across the bow of Makerbot, Bits From Bytes, Techzone, and the other commercial 3d printers.


Here's the fun part.  To order you have to fill out a purchase order, email it to them.  Then they will email you back to confirm the order and tell you how to pay.  It's shaddy as heck, but  this is likely some dude in a small village. :)

Sunday, August 1, 2010

I need design advice? And who better to ask than a community of Developers?


I have a choice, and I can't really figure out which direction to go.  If I keep the build plate 6 inch, and continue to use 608 skate bearings, & place the extruder on the X trolley, Brutis will only have +- 50mm travel in the Z axis.  I could very easily end up with only 40 mm in the Z axis by the time I give myself some margin.  This is enough travel to be able to print all the Mendel parts, which is the main design goal, but it would give a build area of 150mmx150mmx40mm which looks really sad...

I see a few directions I could go here, any advice?

a. Since the top vertexes are already different than the bottom axises, I could make those vertex much bigger (same size as the Mendel, but with only 6mm/ 1/4 rod), and turn the gear motor sideways and design a whole new extruder that can fit between the upper threaded rods.

b. Forget having the extruder on the trolley and just go back to assuming bowden extruder (which adds cost, reduces print quality, and makes this harder to calibrate).

c. Make the build area bigger, therefore adding 5mm in the Z for every 10mm I add in build area.  I have to be careful here because the point here is to keep the print time below 20 hours.

d.  Since 40mm is enough for Mendel say the hell with it and just let it be.

e.  Something that I am missing that you would be kind enough to share?

I know I need to alter the placement of the Y motor (needs to go lower), to allow more room for the smooth rod supports.  Also I need to move the cross beams that support the Z axis down below the side bars to again allow more room for that y stage.  But she is looking good in my opinion.  But I am at a point where either I have a lot more work to do, or I get to start making printed prototypes on Monday.  What do you say?